Development
CG
Dreamworks animation (DWA) usd-manager
https://github.com/dreamworksanimation/usdmanager
# virtualenv
python310 -m virtualenv venv
.\venv\scripts\activate

#  branch: python3

python setup.py install
pip install PySide2

python .\build\scripts-3.10\usdmanager
AYON
AYON Frontend
REM
REM ayon-frontend
REM If you don,t have yarn, you can install it by `npm install -g yarn`
REM

cd C:\src\ayon\ayon-frontend

yarn install
yarn build
AYON launcher
#
# ayon-launcher
# 1. On Windows, You need install iscc.exe by scoop install inno-setup
# 2. python39 -m virtualenv ./venv
#

cd c:\src\ayon\ayon-launcher

# proxy setup if needed.

.\venv\scripts\activate

./tools/manage.ps1 create-env
./tools/manage.ps1 install-runtime-dependencies
./tools/manage.ps1 build
./tools/manage.ps1 make-installer
AYON Dependencies Tools
# 创建.env文件, 这个apiKey是从项目文件,找一张有图片的,在浏览器按F12,定位元素到这种图片,在url中会显示token,将token填入下方
: AYON_API_KEY=
: AYON_SERVER_URL=http://<addr>:<port>

cd C:\src\ayon\ayon-dependencies-tool

# Change python version same as your project, for me for now, it's python3.9.13, my system has 3 versions of python, 3.9,3.10,3.11, and installed by scoop, commonly I use virtualenv, but I removed the default scoop-shims of python.exe,python3.exe, and only keep the python39,python310,python311 on my system.

.\start.ps1 install
.\start.ps1 create -b <bundle_name>
AYON addons
# from self
# 1. use https://github.com/ynput/ayon-addon-template to create your own addon or clone the official addon repository
# 2. create a python virtualenv that version compatibility with your project (for now 24.01.17, needs python3.9.13), after create it, activate it. then run
poetry run python create_package.py
# from openpype (all)
cd c:\src\ayon\openpype
./.poetry/bin/poetry run python ./server_addon/create_ayon_addons.py
AYON Documentation
# Install yarn if needed
# npm install -g yarn
yarn add docusaurus --dev
cd website
yarn start
AYON Docker
(for windows Docker Desktop) - Recommand
# powershell
cd C:\src\ayon\ayon-docker

# If you have one, you can speed it up
$env:http_proxy = "http://localhost:10809"
$env:https_proxy = "http://localhost:10809"

# from template.json to server
#  exection only once need.
.\manage.ps1 setup

# Use official docker image
.\manage.ps1 update

# build whole things (from local)
.\manage.ps1 build
AYON Backend
(for windows WSL)
#!/bin/bash

# Windows (WSL)

#
# On Windows (Outside WSL) - Port Forward
# - Use `wsl -- ifconfig eth0` get wsl-ip, then:
# netsh interface portproxy add v4tov4 listenport=5000 listenaddress=0.0.0.0 connectport=5000 connectaddress=<wsl-ip>
# netsh interface portproxy show all
# netsh interface portproxy delete v4tov4 listenport=5000 listenaddress=0.0.0.0
#

#
# On WSL - Install Project (user environment, root is ok.)
# - If you have better network for pip, You don't need this line.
# export http_proxy=http://<address>:<port>
# export https_proxy=http://<address>:<port>
# pip install -U pip
# pip install poetry
# poetry config virtualenvs.create false
# python3 -m virtualenv /home/<user>/venv-ayon
# source /home/<user>/venv-ayon/bin/activate
# cd /mnt/c/src/ayon/ayon-backend
# poetry install --no-interaction --no-ansi
#

#
# On noth (Manual)
# - Windows
# wsl --shutdown -d Ubuntu-22.04
# wsl -d Ubuntu-22.04
# - WSL (ayon.pid, backend-server need, for non-root user only.)
# sudo touch /var/run/ayon.pid
# sudo chown <user> /var/run/ayon.pid
#

#
# ! Need yarn build frontend first.
#

# sh /mnt/c/src/ayon/ayon-backend.sh

. /home/<user>/venv-ayon/bin/activate

echo <password> | sudo -S touch /var/run/ayon.pid
echo <password> | sudo -S chown <user> /var/run/ayon.pid

# host_ip=$(cat /etc/resolv.conf |grep "nameserver" |cut -f 2 -d " ")
# export ALL_PROXY="http://$host_ip:<port>"

export AYON_postgres_url=postgres://<username>:<password>@<addr>:<port>/ayon
export AYON_redis_url=redis://<username>:<password>@<addr>:<port>

export AYON_frontend_dir=/mnt/c/src/ayon/ayon-frontend/dist
export AYON_addons_dir=/mnt/c/src/ayon/ayon-addons/dist
export AYON_log_file=/mnt/c/src/ayon/log-backend.log
export AYON_SETTINGS_TEMPLATE=/mnt/c/src/ayon/template.json
export AYON_force_create_admin=1
export AYON_auth_pass_pepper=<secure_password>

export PYTHONBUFFERED=1
export LOGLEVEL=info

cd /mnt/c/src/ayon/ayon-backend

gunicorn \
  -k uvicorn.workers.UvicornWorker \
  --log-level ${LOGLEVEL} \
  --timeout 120 \
  -b :5000 \
  ayon_server.api.server:app
AYON Openpype (Deprecated)
更详细: CG Pipeline
GitHub - ynput/OpenPype: Main OpenPype repository and AYON openpype addon codebase
开源Pipeline管理工具。
# python version 3.9.13
$Env:http_proxy = "http://localhost:10809"
$Env:https_proxy = "http://localhost:10809"
.\tools\create_env.ps1
.\tools\fetch_thirdparty_libs.ps1
.\tools\build.ps1
Armory
ArmorCore
cd armorcore
# Unpack `v8\libraries\win32\release\v8_monolithz` using 7-Zip - Extract Here (exceeds 100MB)
.\Kinc\make.bat -g direct3d11
ArmorPaint
GitHub - armory3d/armortools: 3D Content Creation Tools
贴图绘制软件。
# 解压 `..\armorcore\v8\libraries\win32\release\v8_monolithz` using 7-Zip - Extract Here (exceeds 100MB)

# 生成工程
cd c:/src/armortools/armorpaint
..\armorcore\Kinc\make --from ..\armorcore -g direct3d11

# 在"build\ArmorPaint.sln"中打开生成的 Visual Studio 项目针对 x64 和Release进行构建和运行

# Copy build\x64\Release\ArmorPaint.exe to build\krom to run ArmorPaint.exe directly
Armory3D
GitHub - armory3d/armory: 3D Engine with Blender Integration
一个游戏引擎,可以在 Blender 中构建游戏。
ArmorLab
AI驱动的纹理创作工具,图片或文字->贴图。
cd armortools/armorlab
git clone https://github.com/armory3d/onnx_bin onnx
# Unpack `models.zip` from https://github.com/armory3d/armorai/releases into `Assets/models` using 7-Zip - Extract Here

# Unpack `..\armorcore\v8\libraries\win32\release\v8_monolithz` using 7-Zip - Extract Here (exceeds 100MB)
..\armorcore\Kinc\make --from ..\armorcore -g direct3d11
OpenUSD
GitHub - PixarAnimationStudios/OpenUSD: Universal Scene Description
数据交换格式。
构建
# python version 3.10.11
# run `x64 Native Tools Command Prompt for VS 2022`
# for download usd-src
set http_proxy=http://localhost:10809
set https_proxy=http://localhost:10809
# venv
python -m pip install virtualenv
python -m virtualenv C:/src/OpenUSD/venv
call C:/src/OpenUSD/venv/Scripts/activate
# for usdview
pip install PyOpenGL
pip install PySide6
pip install opencolorio
pip install numpy
# for usdSchemaGen
pip install jinja2
# build dry run, to build remove -n option
python .\build_scripts\build_usd.py --materialx --draco --alembic --hdf5 --openimageio --opencolorio --embree --openvdb --ptex --prman --test --build-variant=relwithdebuginfo --src=c:\data\build\usd-src --build-args=USD,"-DPXR_ENABLE_VULKAN_SUPPORT=FALSE -DRENDERMAN_LOCATION=C:/data/plugins/RenderManProServer-25.2" c:\data\build\usd-build –n
Schema
usdGenSchema [schemaPath] [codeGenPath]
Blender
开源全功能的DCC软件。
git clone https://projects.blender.org/blender/blender.git
cd C:\src\blender-git\blender
make update
make full nobuild
QuiltiX
基于节点的MaterialX材质编辑。
python version 3.9.13
# via pypi (install)
pip install QuiltiX
pip install git+https://github.com/PrismPipeline/OpenUSD_build.git@23.11-win-mtlx-1.38.8

# run
python -m QuiltiX
gatling
GitHub - pablode/gatling: Hydra-enabled GPU path tracer that supports MaterialX and MDL
Hydra光追渲染器。
cmake -B build -Wno-dev -DUSD_ROOT=%E_USD_LOCATION% -DMDL_ROOT=%E_MDLSDK_DIR% -DCMAKE_INSTALL_PREFIX=C:/data/build/gatling -DCMAKE_BUILD_TYPE=Release
cmake --build build --config Release --target INSTALL -- /M:8
xComp
GitHub - gugenstudio/xComp: best render comparing software in town!
cmake -B build -DCMAKE_TOOLCHAIN_FILE="%E_VCPKG_DIR%\scripts\buildsystems\vcpkg.cmake"

cmake --build build --target xcomp --config Release

# Working-dir on
#   C:/src/xComp/apps/xcomp/../debug_dir
# Copy _bin/Release/* to Working-dir
AI
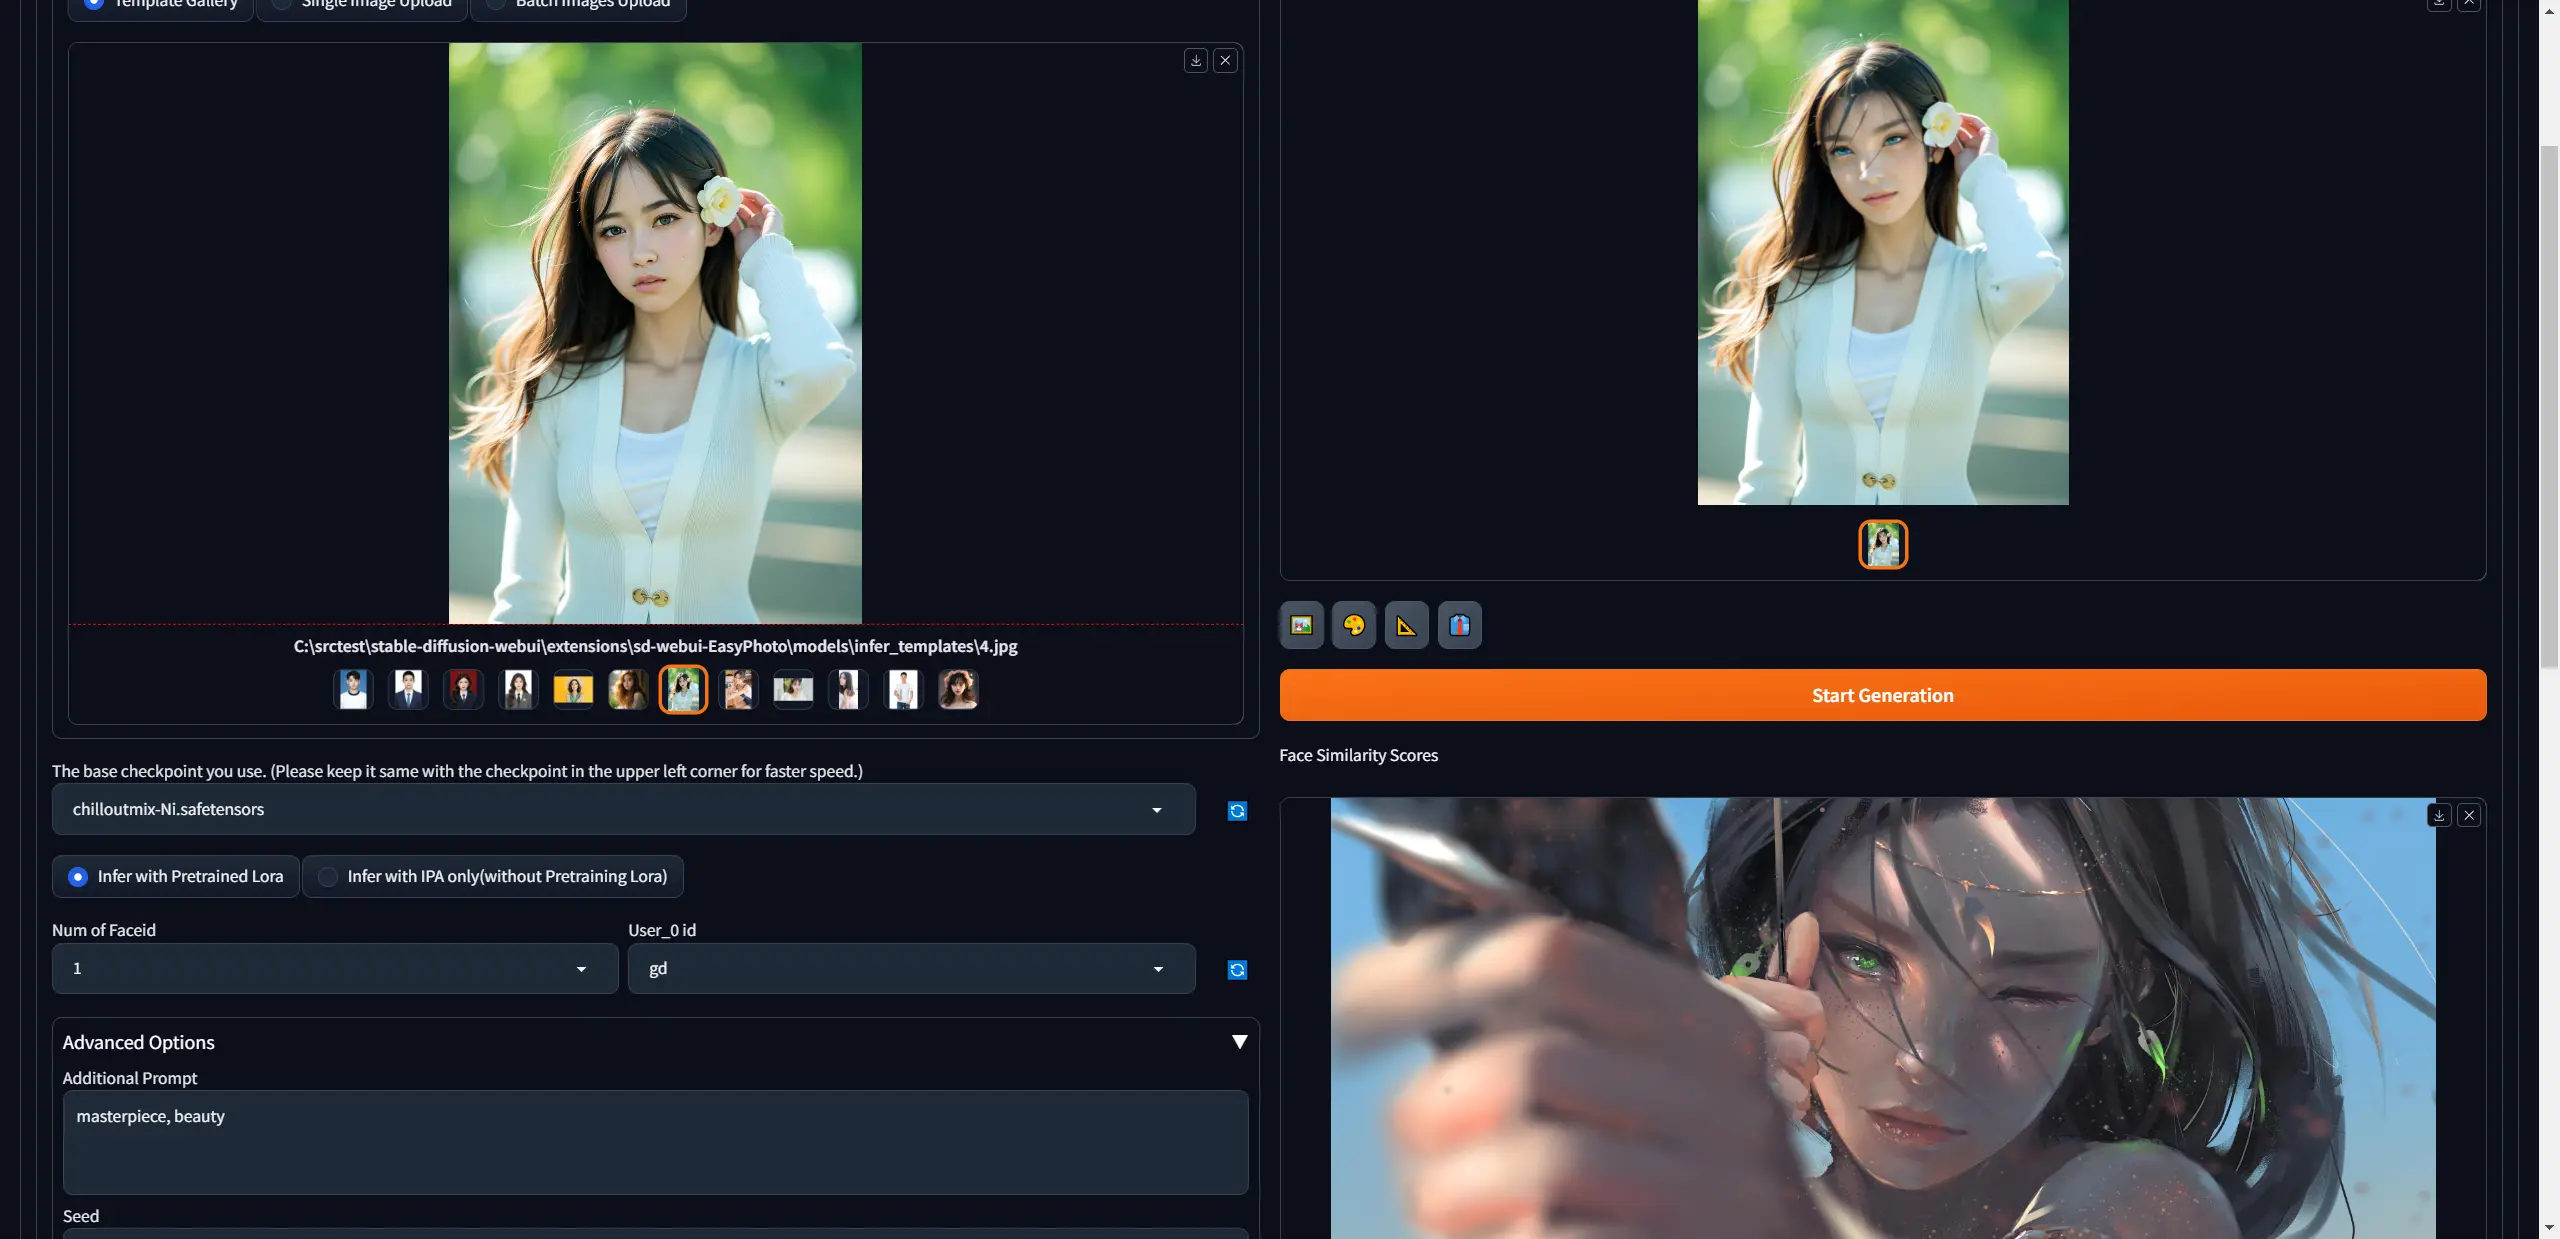
SD-WebUI-EasyPhoto
GitHub - aigc-apps/sd-webui-EasyPhoto: 📷 EasyPhoto | Your Smart AI Photo Generator.
输入了一些右下方的图片训练出Lora后,就可以扩散风格到人物肖像上。
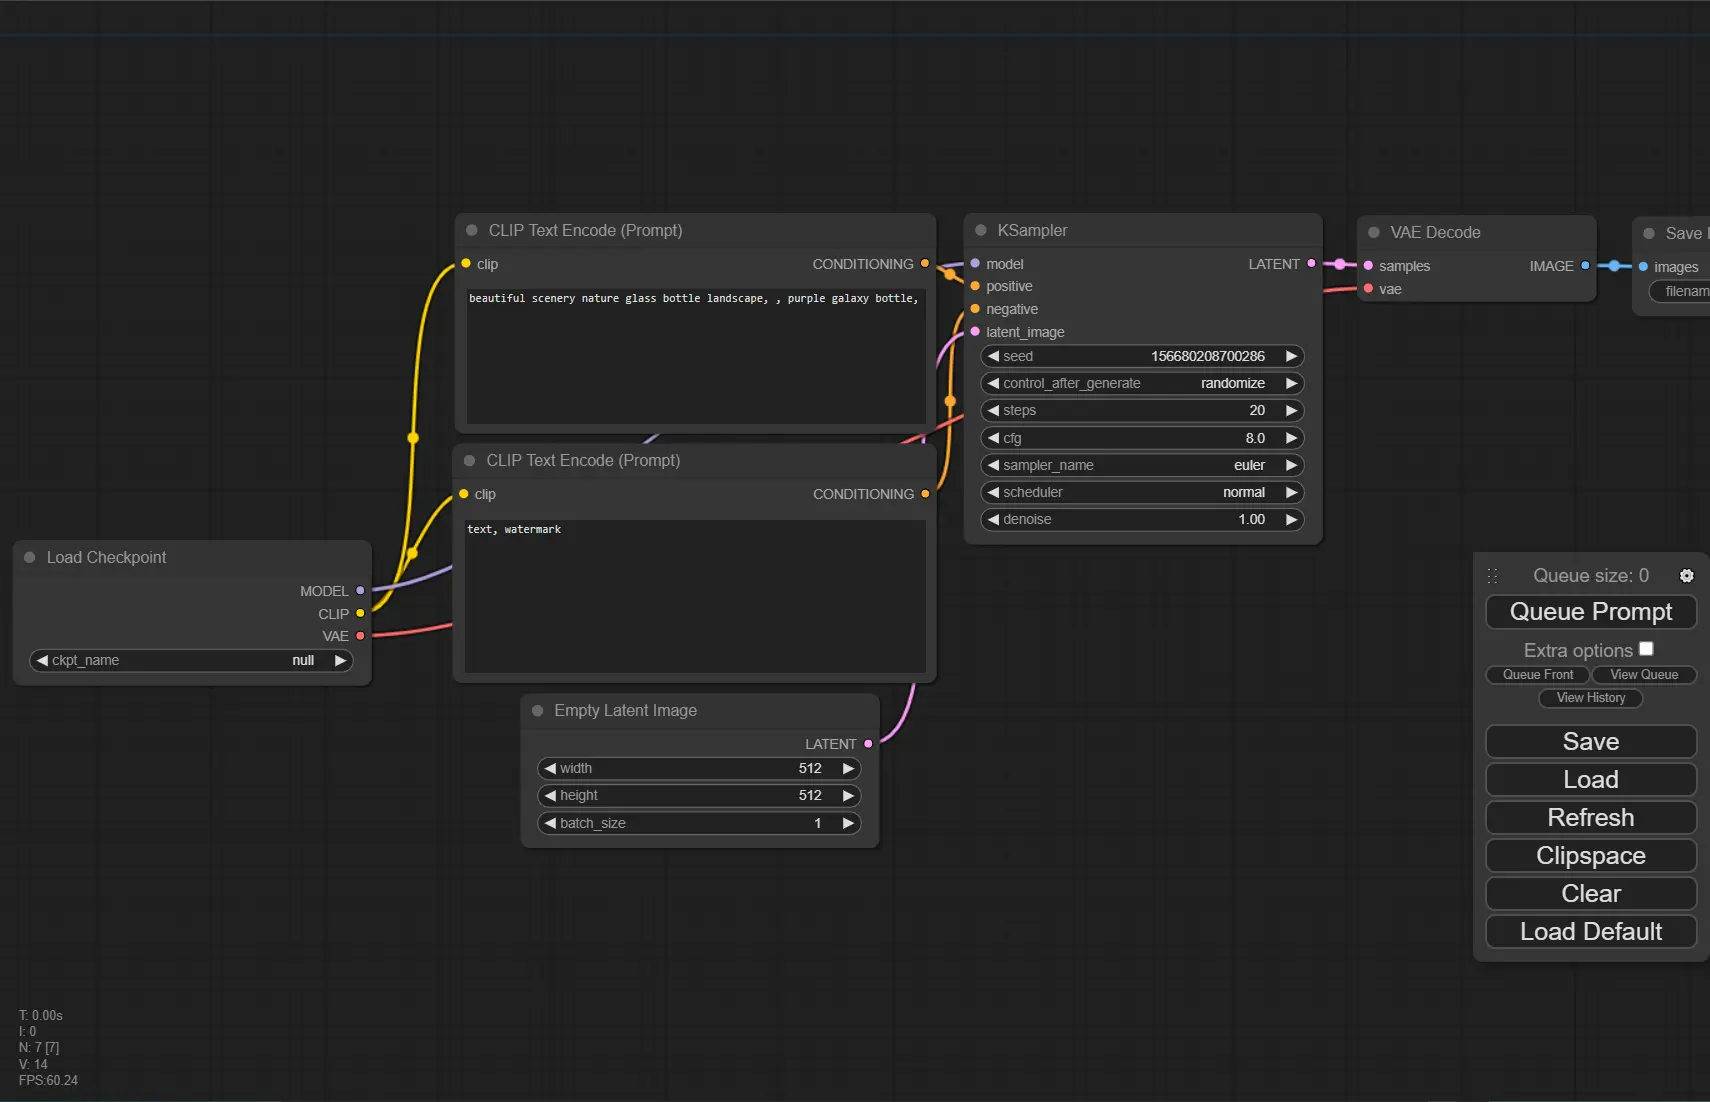
ComfyUI
SD的图形用户界面,具有节点图。
Stable-diffusion-Webui
GitHub - AUTOMATIC1111/stable-diffusion-webui: Stable Diffusion web UI
# python version 3.10.11
git clone https://github.com/AUTOMATIC1111/stable-diffusion-webui.git

.\webui-user.bat
config
webui-user.bat
set COMMANDLINE_ARGS=--ckpt-dir <path> --lora-dir <path>
Krita-ai-diffusion
在 Krita 中使用AI生成图像的一个插件。
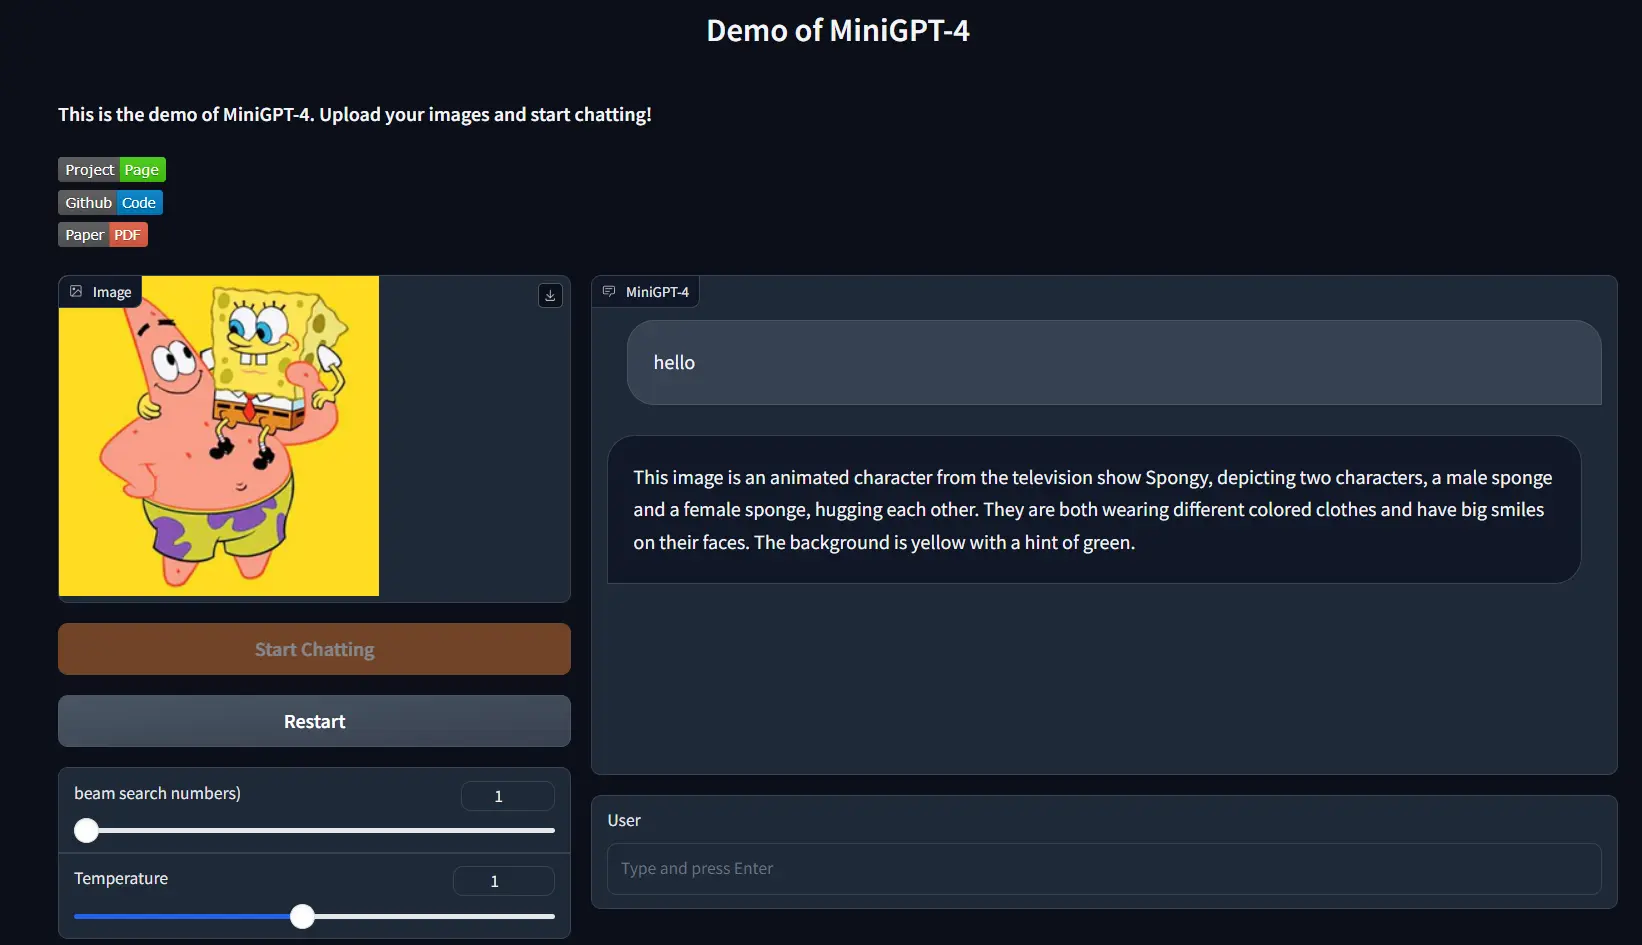
MiniGPT-4
1.我使用的Vicuna-7B,low_resource=False, 最少GPU显存 16GB。如果是True,我这里使用了10GB。
2.安装CUDA Toolkit 12/11。
Windows的支持
Windows not supported · Issue #28 · Vision-CAIR/MiniGPT-4 · GitHub
# 也许可以不用conda,使用virtualenv
git clone https://github.com/Vision-CAIR/MiniGPT-4.git
cd MiniGPT-4
##conda env create -f environment.yml
##conda activate minigptv

# 卸载不支持GPU版本的包
pip uninstall bitsandbytes
pip uninstall torch
# 重新安装torch与bitsandbytes
##这个不更新啦,使用下面那个
##pip install git+https://github.com/Keith-Hon/bitsandbytes-windows.git
pip install scipy
pip install bitsandbytes==0.41.2 --index-url=https://jllllll.github.io/bitsandbytes-windows-webui

pip3 install torch torchvision torchaudio --index-url https://download.pytorch.org/whl/cu121

---

python demo_v2.py --cfg-path eval_configs/minigptv2_eval.yaml  --gpu-id 0
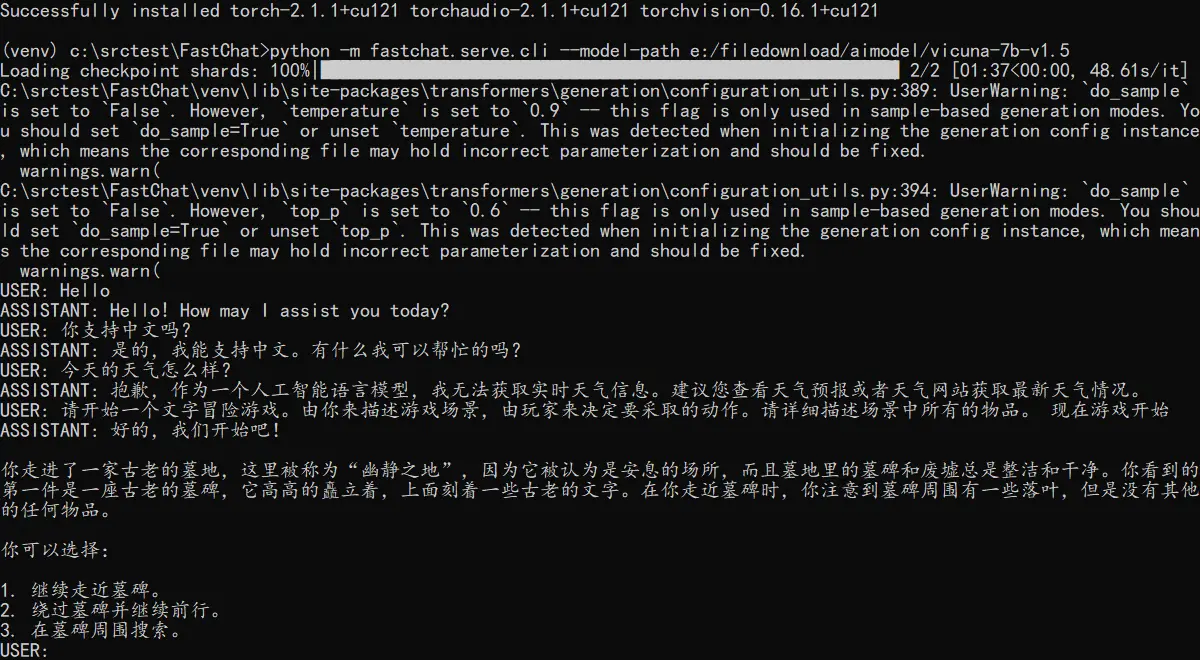
FastChat
GitHub - lm-sys/FastChat: An open platform for training, serving, and evaluating large language models. Release repo for Vicuna and Chatbot Arena.
GPU16GB显存,加载了vicuna-7b和vicuna-13b。
git clone https://github.com/lm-sys/FastChat.git
cd FastChat
# use venv
pip3 install --upgrade pip  # enable PEP 660 support
pip3 install -e ".[model_worker,webui]"

---

# cli
python -m fastchat.serve.cli --model-path lmsys/vicuna-7b-v1.5-16k --load-8bit --cpu-offloading

# gradio
python -m fastchat.serve.controller
python -m fastchat.serve.model_worker --model-path lmsys/vicuna-7b-v1.5-16K --load-8bit --cpu-offloading
python -m fastchat.serve.gradio_web_server
Ye
ub
python开发环境
python310 -m virtualenv C:\src\Ye\src\ub\venv
# pip install dependenties with requirements.txt
Dev
(Tools)
pyside-setup
vcpkg
# download & install
git clone https://github.com/microsoft/vcpkg
.\vcpkg\bootstrap-vcpkg.bat

# qt6
...
(Python)
conda
# Shell Register
conda init cmd.exe
# Shell Unregister
conda init cmd.exe --reverse

# Update
conda update -n base -c defaults conda
## Or minimize update use
conda install conda=23.11.0
pyenv
core compoment install error. So we use this command Invoke-WebRequest -UseBasicParsing -Uri "https://raw.githubusercontent.com/pyenv-win/pyenv-win/master/pyenv-win/install-pyenv-win.ps1" -OutFile "./install-pyenv-win.ps1"; &"./install-pyenv-win.ps1" from Installing and setting up Python - Everything I Know
在这之后,需要执行 pyenv update 去更新仓库。
pipx
GitHub - pypa/pipx: Install and Run Python Applications in Isolated Environments
# python version 3.10.11
python -m pip install --user pipx

# add executable to environment path
python -m pipx ensurepath

pipx install pycowsay
poetry
GitHub - python-poetry/poetry: Python packaging and dependency management made easy
Install and Upgrade
python -m pipx install poetry
python -m pipx upgrade poetry

# Or
# create virtualenv, then (Recommand)
pip install poetry

# Or

pip install pipx
pipx install poetry
pipx upgrade poetry
(Version Control)
- gitbucket
scoop bucket add java
scoop install temurin11-jdk

set GITBUCKET_PORT=12122
set GITBUCKET_HOST=0.0.0.0
set GITBUCKET_HOME=<your_data_path> # The default is $HOME/gitbucket
java -jar gitbucket.war
https://github.com/gitbucket/gitbucket
- git
- SnowFS
- TortoiseSVN
# 重置当前仓库
svn revert --recursive .
# 忽略文件(项目级)
图形界面 TortoiseSVN -> Properties -> New -> Other -> svn:global-ignores
# 忽略文件(目录级)
选中一个文件/目录 -> TortoiseSVN -> Properties -> New -> Other -> svn:ignore
- VisualSVN Server
SVN -> Import 可以将当前目录的所有文件上传项到SVNServer的版本库。
SVN -> Checkout 输入仓库地址与路径可以检出。
1.SVN连接不到VisualSVN服务,检查是不是开启了代理。%appdata%\Subversion\servers 编辑这个文件,注释掉下方两行。
#http-proxy-host = 127.0.0.1
#http-proxy-port = 10809
(Database Connection)
Mongosh - https://www.mongodb.com/try/download/compass
Mysqlsh - https://dev.mysql.com/downloads/shell/
for database install on Linux, see OS-Linux
(Cloud Services)
我们缺少的不是工具,而是真正产生价值的点子。
Vercel
Cloudflare
fly.io
(AI)
概念
-
pytorch: Start Locally | PyTorch
-
tensorflow: GitHub - tensorflow/tensorflow: An Open Source Machine Learning Framework for Everyone
-
ONNX:Open Neural Network Exchange(开放式神经网络交换)ONNX | Home
-
OpenVINO - 从框架中优化深度学习模型。
-
RL-LLM - 大模型+强化学习
-
Gradient descent 梯度下降 - (鞍点,局部最优)
- derivate - 求导,learning rate 学习速率
- sgd 随机梯度下降,Momentum动量,Adam (替代随机梯度下降算法)
- partial derivate 偏微分
- gradient 梯度 - 所有的偏微分的向量 e.g.
- Convex function 凸函数 - 全局最优解
- 梯度离散/爆炸 - 误差积累导致,前层得不到更新
-
Backpropagation 反向传播
-
Activation Functions 激活函数 - 阈值响应机制
- Sigmoid -
- Tanh -
- Rectified Linear Unit (ReLU) -
- Leaky ReLU
- SELU - 两个函数的合并
- Softmax - [Logits Scores -> Softmax -> Probabilities], 概率和为1
- Softplus - ReLU函数的平滑版本
- Sigmoid -
-
Typical Loss
- Mean Squared Error (MSE) 均方误差
- Cross Entropy Loss 交叉熵
- Hinge Loss
-
Himmelblau Function函数 - 数学家构造的特殊函数,用来测试深度学习算法是否能够收敛到局部最小值。
-
Chain rule链式法则 -
 求解过程是
求解过程是 -
Dropout regularization - 为了防止过拟合。Dropout的思想是对于网络的每一层,随机的丢弃一些单元。
-
PCA - 主元分析,用于提取数据的主要特征分量。主要用于数据降维。例如两维数据房价与面积,房价与面积的正相关性很大,其中一维的数据是冗余的。
-
Sequence 序列
- Word Embedding
- Word2vec
- GloVe
- One-hot:
[0,1,0,0,…]- 稀疏,高维
-
AutoEncoders -
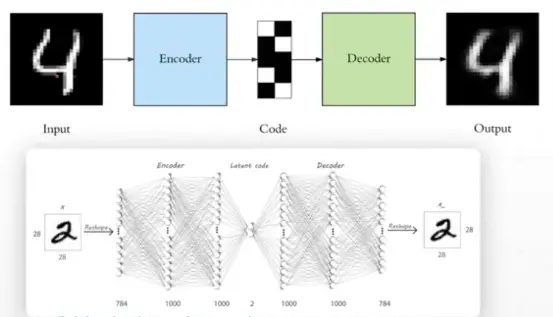 中间是Neck,可以升/降维。
- Denoising AutoEncoders 去噪自编码器
- Dropout AutoEncoders
- Adversarial AutoEncoders 对抗自编码器
- Variational AutoEncoder (VAE) 变分自编码器
-
Gradient Clipping - 用于缓解梯度爆炸。
-
Zeno/One/Few-Shot Learning 零/一/少样本学习。例如,当我们只有一张狮子的照片时,一次样本学习可以帮助我们将新的狮子图像正确分类。
-
RLHF(Reinforcement Learning from Human Feedback,人类反馈强化学习)。是GPT-4/ChatGPT与GPT-3.5的主要区别。
-
Anomaly Detection 异常侦测
-
LoRA,英文全称Low-Rank Adaptation of Large Language Models,直译为大语言模型的低阶适应,这是微软的研究人员为了解决大语言模型微调而开发的一项技术。
-
PGNet是一种新颖的框架,用于通过点收集操作实时阅读文本。 基于多任务学习的单步文本检测识别器。
-
SFT(Supervised Fine-Tuning)监督微调
- AGI(通用人工智能)1.人工智慧是我们的目标。2.人类的能力是本能与学习。
- Machine Learning - 1.是达成目标的手段。2.就是让机器找到一个函式(找到函式三步骤- a.设定范围(订出候选函式集合-Model),b.设定标准(评量函式好坏-Loss),c.达成目标(找出最好的函式-最佳化Optimization))。
- Deep Learning 深度学习 1.是机器学习的其中一种方法
- Machine Learning - 1.是达成目标的手段。2.就是让机器找到一个函式(找到函式三步骤- a.设定范围(订出候选函式集合-Model),b.设定标准(评量函式好坏-Loss),c.达成目标(找出最好的函式-最佳化Optimization))。
- Supervised Learning
- Linear Regression 线性回归
- Logistic Regression 逻辑回归 - 线性回归的基础上加了一个激活函数(压缩函数)
- Classification 分类问题
- Semi-supervised Learning - 半监督学习。
- Linear Regression 线性回归
- Unsupervised Learning
- Reinforcement Learning - 增强学习。游戏例如Dota,与环境交互反馈。
- Representation Learning - 表征学习。
- Structured (Generative) Learning - 结构(生成式)学习。
- Meta Learning - 元学习,也叫做学会学习,learn to learn。人类学习新东西时会用到之前学的东西,比如你会玩LOL,那么对玩王者荣耀会很快。目前的深度学习遇到的问题是在遇到新的问题,即使比较类似的情况下,也要重新学习,这一差异就是MetaLearning的动机。
- Transfer Learning 迁移学习 一种神经网络学习到了识别Cat这种物体,再使用这部分知识或者部分知识去识别X-Ray扫描。(Pre Training 预训练, Fine Turning 微调)
- Multitask Learning - 神经网络同时执行多项任务,每个任务都会影响其他任务
-
Feedforward neural network (前馈神经网络) 也叫做感知机(Perceptron) - 二分类线性模型
-
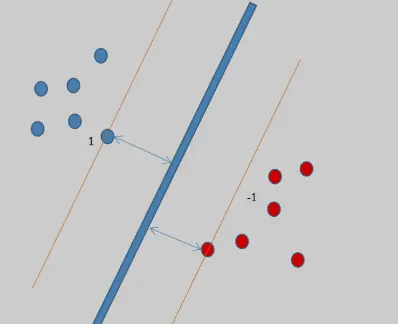
SVM (Support vector machine) 支持向量网络 -
-
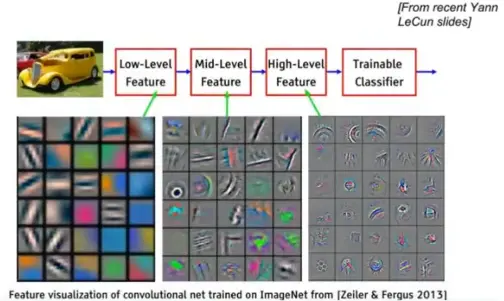
卷积神经网络:局部感知 -
- Weight sharing 权值共享
- 池化 - Max pooling, Avg polling
- Downsample, Upsample, Subsampling
- Weight sharing 权值共享
-
RNN 循环神经网络 - (Hard to parallel) 语境信息上下文,引入memory的机制,
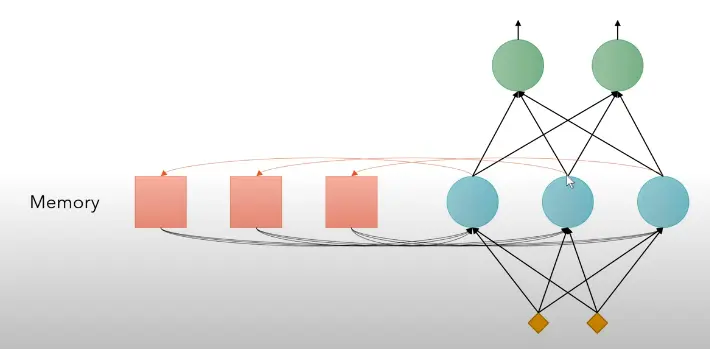 , 问题是很容易造成梯度离散或梯度爆炸。
- LSTM - (Long Short-Term Memory) 长短时记忆 - 解决了记忆长度的问题。引入"闸门"的机制。
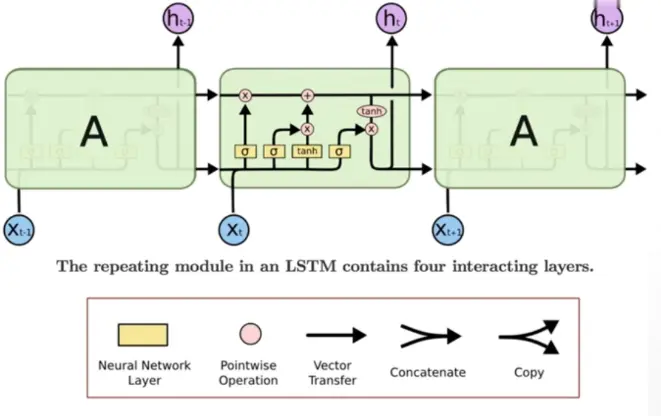 闸门就是Sigmoid函数。输入门,遗忘(记忆)门。
- LSTM - (Long Short-Term Memory) 长短时记忆 - 解决了记忆长度的问题。引入"闸门"的机制。
-
CNN 卷积神经网络 - Using CNN to replace RNN (CNN Can parallel)
-
GAN 生成对抗性网络
- Train 训练
- Generator 生成
- Discriminator 鉴别 一文看懂「生成对抗网络 - GAN」基本原理+10种典型算法+13种应用
- Train 训练
-
Self-Attention Layer - Transformer
- q:query (to match other)
- k:key (to be matched)
- v:information to be extracted
-
- Positional Encoding (
)
-
Multi-head Self-Attention (MHSA)
- Norm (Layer Norm, Batch Norm, Instance Norm, Group Norm)
-
Transformer
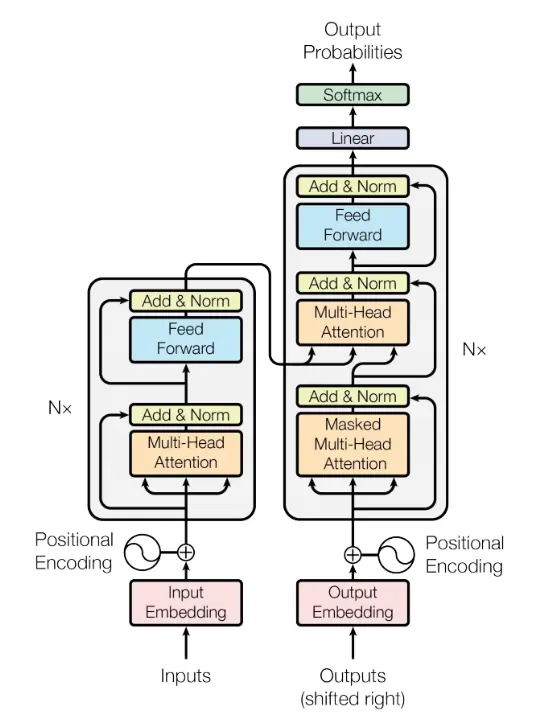 这是一个seq2seq的model,左半部是Encoder,右半部是Decoder。
- Universal Transformer - (横轴Positions使用Transformer,纵轴Depth使用RNN)
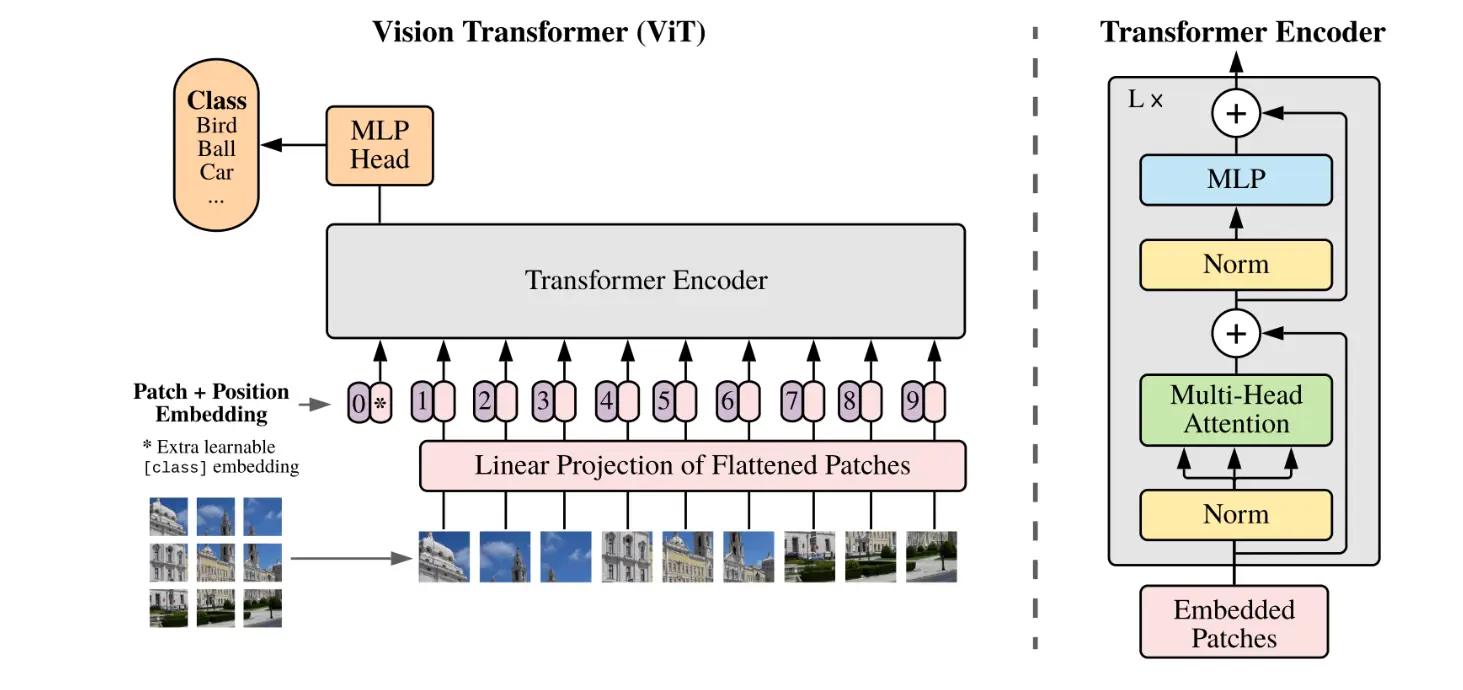
- Vision Transformer - 是Google提出的基于Transformer的图片分类模型。
-
Self-attention GAN - 用于影像处理的Transformer,一个pixel考虑全部pixel信息。
-
扩散模型
- Noising Process
- Noising Process
-
多模态模型架构
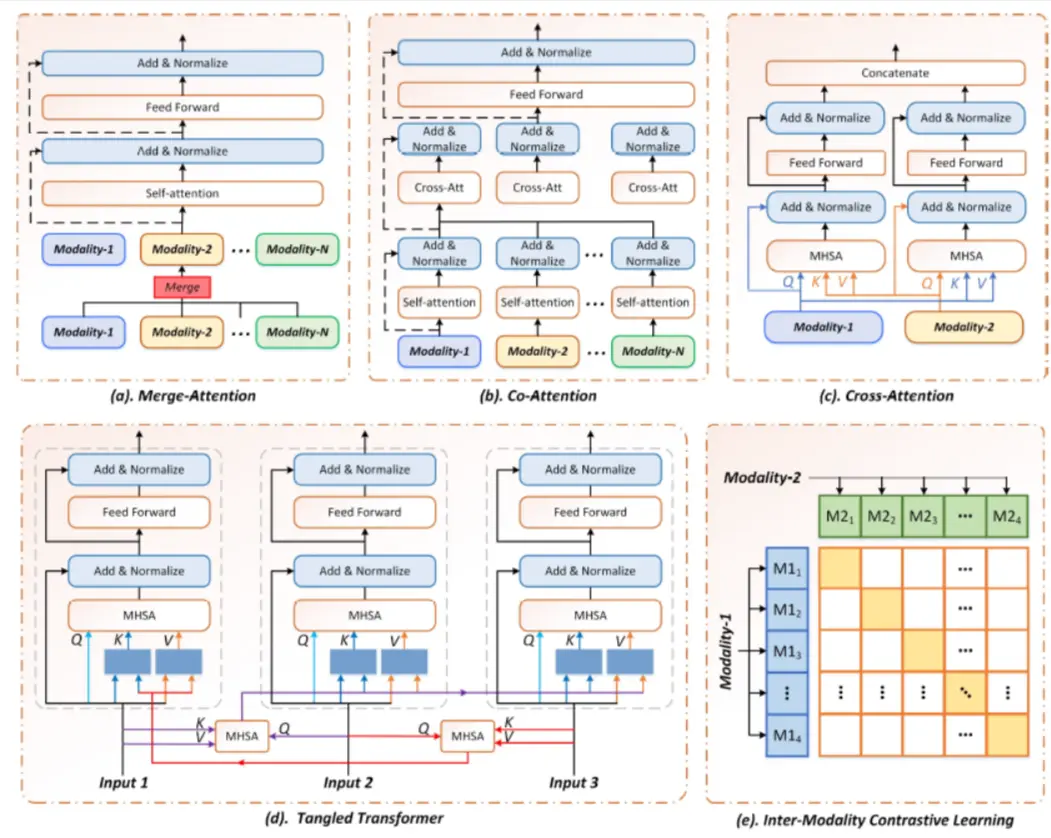
- 1)合并注意力架构(Merge-attention)
- 2)共同注意力架构(Co-attention)
- 3)交叉注意力架构(Cross-attention)
- 4)三角Transformer架构(Tangled-transformer)
- 5)模态间对比学习架构(Inter-Modality Contrastive Learning)
模型
-
大型语言模型(LLM)- 文字接龙..
- ChatGPT
- nanoGPT 是一个用于对中等规模的生成式预训练 Transformer(GPT)进行训练和调优的框架。
- Llama2
- Mistral-7B
- Mixtral 8x7B - MoE(Mixture of Experts)
- WizardCoder
- 羊驼系列
- Vicuna -Based On LLaMa-13B
- Alpaca -Based On LLaMa-7B
- Guanaco - Based On QLoRA quantification
- LaMDA (Language Models for Dialog Applications)
-
多模态模型
- GPT 生成式预训练变换模型
- Macaw-LLM:具有图像、视频、音频和文本集成的多模态语言建模
- CLIP ViT-L (Vision Transformer - Low resolution): Connecting text and images。
- Stable Diffusion
- SVD (Stable Video Diffusion)
- Flamingo
- LLaVA
-
扩散模型
-
连续型扩散模型
- DDPM 去噪扩散概率模型(Denoising Diffusion Probabilistic Models)
- DDIM 去燥扩散隐式模型 (Diffusion Denoising Implicit Model)
- Improved Diffusion
- Classifier Guidance 亦被称为Guided Diffusion
- Classifier Free Guidance
- DALL-E-2 - AI图形生成器
- Google Imagen
- LCM (Latent Consistency Model)
-
离散型扩散模型
- Multinomial Diffusion
- D3PM
- ImageBART
-
-
语言表征模型
- BERT
- GPT
- ELMO
-
视觉模型
- MiDaS - 通过单张图像计算相对深度。
- Next-ViT - [2207.05501] Next-ViT: Next Generation Vision Transformer for Efficient Deployment in Realistic Industrial Scenarios
- VI-Depth
-
卷积神经网络模型
- ResNet (深度残差网络): 短路层(Skip to shortcut)
- AlexNet
- GoogLeNet - 22 layers
- VGGNet-11/16/19 - 更小型的卷积核心。1x1 convolutions.
- LeNet - 80年代
- UNet - 为生物医学图像分割开发的卷积神经网络。
- 其它模型
- SMPL - A Skinned Multi Person Linear Model,用于人体动作捕捉。
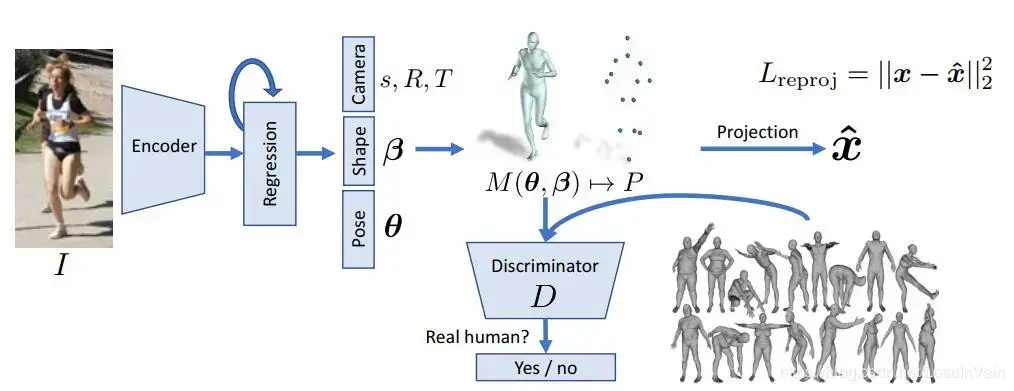
- SMPL - A Skinned Multi Person Linear Model,用于人体动作捕捉。
有哪些数据集
- MNIST - 手写数字
- ImageNet
- CIFAR10/100 - 10类6000张照片。
资料
谷歌研究论坛Google Research Blog
词嵌入数据可视化Embedding projector - visualization of high-dimensional data
LLM可视化 https://bbycroft.net/llm
李宏毅
吴恩达 Andrew NG
学习路径
- 10分鐘了解RNN的基本概念 [6AW80qmaAOk]
- Let's build GPT: from scratch, in code, spelled out. [kCc8FmEb1nY]
- Multitask Learning (C3W2L08) [UdXfsAr4Gjw]
- Transfer Learning (C3W2L07) [yofjFQddwHE]
- 扩散模型是如何工作的-系列 [oSmlciqXOaU]
- PyTorch深度学习框架-龙良曲
应用
- GPT
- 文字冒险游戏 (ChatGPT)
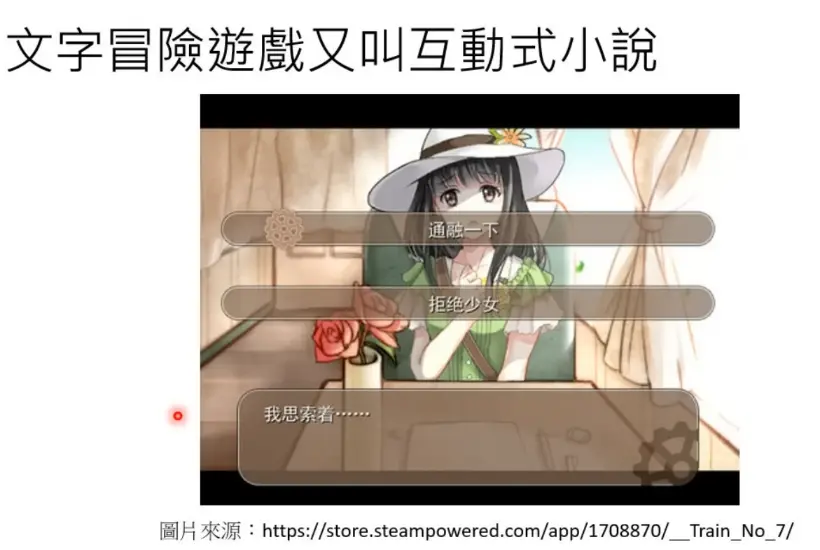
- 解决数学问题(FunSearch)
- 文字冒险游戏 (ChatGPT)
- Diffusion
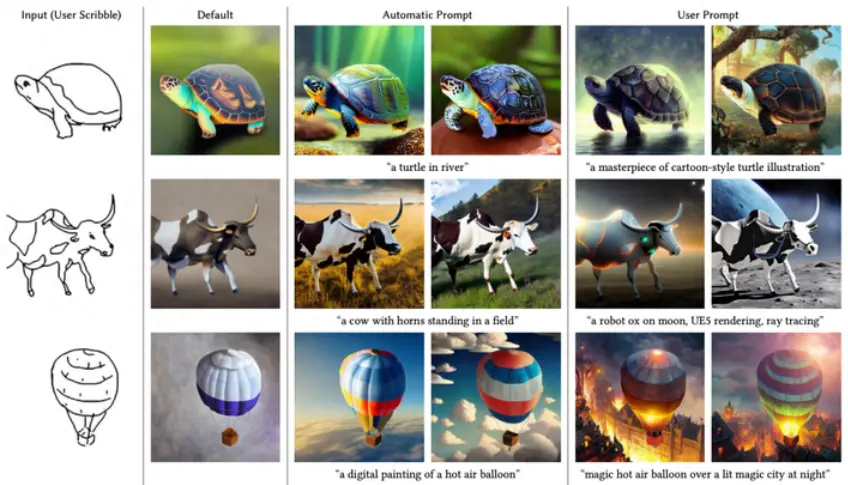
- 可控的图像生成 (ControlNet)
- 图像编辑(概念转换) (DreamBooth)

- 图像编辑(文本驱动)
- 图像修复/扩展
- 图像的风格迁移 (BLIP-Diffusion)
- 图像的交互式编辑 (DragGAN,DragDiffusion)
- 可控的图像生成 (ControlNet)
(Graphics)
概念
- 场
- 标量场 - 符号距离场(SDF), 密度场(Density Field), 散度场(描述一点是汇聚还是扩散)
- 符号距离场 - 梯度即法线,大小即距离
- 向量场 - 速度场,涡度场,加速度场
- 标量场 - 符号距离场(SDF), 密度场(Density Field), 散度场(描述一点是汇聚还是扩散)
- 场的操作
- 标量场 - 梯度(输出:向量场),曲率,拉普拉斯(作用,平滑,算子:热扩散)
- 向量场 - 散度(输出:标量场),旋度,归一化
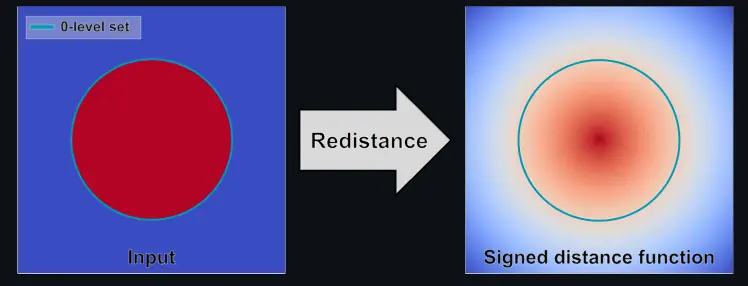
- RenormalizeSDF - 包面的几何只有表示内外而没有距离。需要做Eikonal equation(程函方程)得到带有距离的SDF
- 场,几何,粒子
- 场实际上是任意的几何与粒子的中间介质(中间表达)
- 自由表面 (free surface),包面后的几何
- Eikonal equation(程函方程) - 程函方程的一般形式为
, 约束条件:边界 为 ; 是位置的函数, 是欧几里得范数, 是从边界到Ω内部x的所需要的最短时间,F(x)是在x处耗费的时间。